Weary after several days of travel you find yourselves at the Happy Wheel tavern, where an old man serves you bowls of hot stew and a tale of woe. Many are the locals who have been kidnapped by cultists hiding in an old temple thought abandoned. It lies in the forest north of here—a forest infested by elves and trolls.
Women and children are being sacrificed to some dark god and foul purpose with little hope of rescue. The good folk of the village have collected 200 gold for each of you to destroy the cult, stop the abductions, and once and for all root out the unnamed evil brewing in that cursed old temple. They need heroes. They need you.
NOTES
This two part quest was inspired by a TTRPG adventure from long ago. Another thing that was inspired by old-school roleplaying games is the difficulty. This quest was designed for heroes, not weaklings. Remember that the best thing in life is to drive the heroes before you and to hear the lamentation of their players. (Sorry, I meant to say something about adjusting difficulty but got carried away.)
In part 1, the heroes will encounter cultist Priests and their Devil Wolf companions throughout the temple. These monsters all have the same stats.
| MOVE | ATTACK | DEFEND | BODY | MIND | |
|---|---|---|---|---|---|
| Cultist Priest | 8 | 2 | 3 | 3 | 4 |
| Devil Wolf | 10 | 3* | 2 | 5 | 1 |
The Priest has access to the chaos spell Mind Blast. The Devil Wolf may attack diagonally.
At the start of each evil wizard turn, roll 1 combat die (openly). If the result is a black shield then an Abomination spawns in the room marked M (from the cloud). The Abomination will make its way back up the temple through the room marked H and into G. Track its movement in secret until the heroes become aware of the monster.
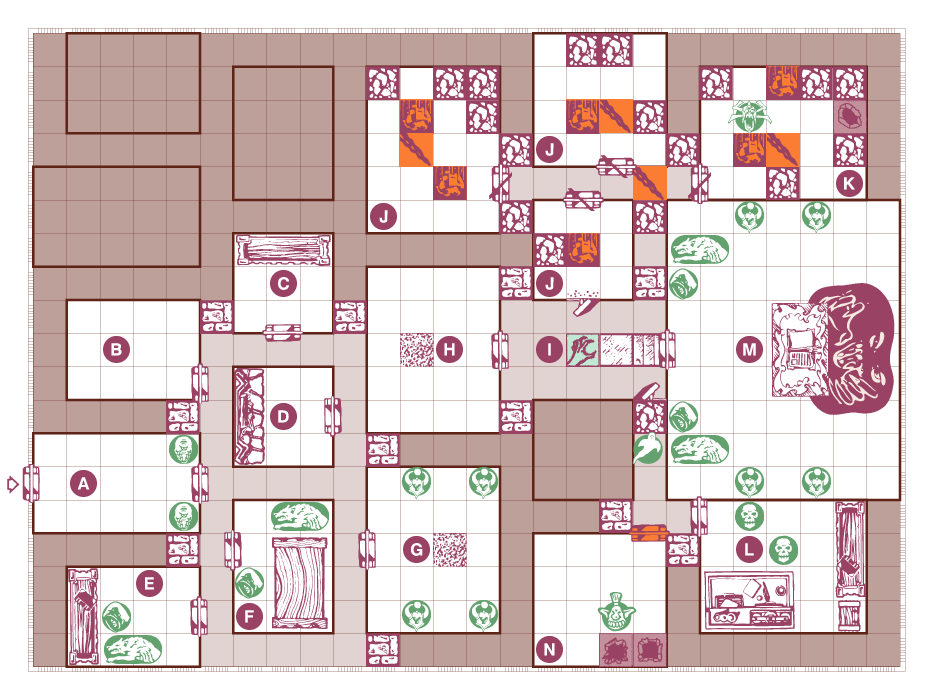
A. This is the temple entrance and the heroes start here. The walls are white marble and the doors are made of smooth oak boards. Two abominations covered in grey slime stand guard outside the inner door.
B. This room is empty except for a set of hangers on the wall. Three dark cloaks hang on the white walls and any hero wearing one can temporarily pass as a cult member. The Priests and Devil Wolves will not attack, unless the hero attacks them first or moves to an adjacent square. The Abominations, however, will still attack. They know. Oh, they know.
C. This is a food storage and there is nothing but meat and sausages in here.
D. This room is a kitchen with pots and pans stacked in piles (nobody has done the dishes even though a sign hangs on the wall informing everyone their mother doesn’t work here). A fire is going in the fireplace and the white walls have been colored gray by soot. It is otherwise empty.
E. This is a library. A heavyset priest in a dark cloak is reading a tiny book while a large wolf rests at his side. The bookshelf contains many tomes written in strange languages, as wells as a Spell Scroll: Treasure Without Doom found by the first hero to search for treasure.
F. The walls in here are the same white as elsewhere in the temple and a communal table stands in the middle. A skinny priest sits by the table eating steak and a large wolf is prowling for scraps.
G. Four statues line the marble walls of this room. They resemble knights but keep shifting and changing all the time, yet are still firm to the touch. In the middle of the room is an oval grey and gooey spot. This is not a trap (no, seriously).
The statues are eternal (a fancy way of saying they do nothing) and the heroes cannot harm them. Any hero who steps on the gooey spot will be instantly transported to a similar spot at H and disappear in a shimmer of light. At first, only remove heroes that stand on the spot from the board. Do not place them until all heroes have decided to either stay or follow. Then continue the quest from H with the ones that went through the portal.
H. This is where the heroes arrive after stepping on the grey spot at G. The portal does not work in reverse unless the Unnamed One has received a sacrifice within the last six hours. Basically, the cultist needs a fresh supply of sacrifices so they can come and go from their own temple (note to self: this backstory is terrible, change it later).
I. The ceiling in this hall is so high it is held in darkness. A set of steps lead up to a doorway almost three meters above the floor. A small hallway along the south end has caved in.
A hero searching for secret doors will find a crack in the northern wall. It can be expanded and the heroes may squeeze through into the caverns beyond it.
When the first hero sets foot on the steps, a Specter emerges from the rubble in the collapsed hallway and attacks (it was originally going to talk to them and give them a side quest, but that became too complicated). Once the Specter has been defeated the heroes will notice part of the cave-in can be cleared out to make it passable. If they do, they find 20 gold and a Phantom Blade under the rubble, and you can remove the tile from the board.
J. These caverns are empty and very unstable. Hard hats are recommended.
K. A Gargoyle hides in this cavern and will attack any hero who enters (in the first draft this was a dead manticore but that didn’t seem very challenging). At the far end a small hole in the cavern wall leads down into the depths beneath the temple. The heroes really should clear out the temple of all its evils first though.
Nevertheless, with the Gargoyle defeated they can climb down the hole and continue with part 2 of the quest in earnest. There is no time to bleed in this adventure, so their body points and abilities are restored. They may not visit the armory or alchemist shop on the way, and they most certainly cannot collect the promised reward—just yet.
L. Everything in this room is covered in dust and a large number of empty wine bottles are scattered about. Skeletons of the long dead (and no longer drunk) rise to attack the heroes as they enter.
If the room is searched for treasure the heroes will find two Spell Scroll: Sleep, a Spell Scroll: Fire of Wrath, two Healing Potions, three bottles of Heroic Brew (aka wine), one bottle containing a strange gray and gooey liquid, and a parchment with the following text (and shameless plot drop for future quests):
There was once a great empire stretching across these lands. It was an ancient high culture, and the first one to use written language. Their warriors were unmatched, both feared and revered, and they worshipped the dark powers and the light in equal measure. Many were their missionaries that built temples in far away lands, before the empire finally fell in the Third War of the First Age.
All that remains of their might are ruined temples and the eternal warriors within. Your Majesty, it is our humble opinion you restore these ancient temples and take control of what once was. Our success at this temple should be a call to action.
Yours faithfully, Signore Pom.
M. This is the inner chamber of the temple, sanctified to the Unnamed One. Along the walls are four statues, exactly the same as the ones in the room marked G. A shifting gray mass hangs along the back wall (behind the sorcerer’s table), similar in nature to the statues. Anything that steps in it is destroyed instantly, consumed by the Unnamed One (and removed from play). If a hero dies this way, the portal at H will work in reverse. A hero that drinks the strange gray liquid found in room L can pass into and out of the wall without harm (note that this will not make the portal at H work).
Two priests guard this chamber together with their wolf companions. They will attack any hero not masquerading as a cult member (with the cloaks found in B). Should a hero disguised as a cult member drink the gray liquid found in room L and pass in and out of the cloud within sight of the priests, they become instantly friendly and make the hero the new high priest of the cult—which is a very strange ending to this adventure. Good thing it’ll never happen (right?)
The heroes can’t do much about the cloud nor destroy it, but will have to settle for killing all of the cultists. Without constant sacrifices, the power of the Unnamed One will fade and the locals should be safe from harm (killing gods is a campaign, not a two part adventure).
N. The door to this room is very sturdy, and also very locked (use one of the heavy square doors to represent it). It can be picked by the dwarf or by using a toolkit just like disarming a trap.
Part of the floor in this room has collapsed to reveal a cavern below. Unfortunately for the heroes, a large troll makes its way up as they enter.
| MOVE | ATTACK | DEFEND | BODY | MIND | |
|---|---|---|---|---|---|
| Troll | 6 | 4/4* | 3 | 6 | 2 |
The Troll attacks twice per turn. If both attacks are against the same target, the target may only defend once.
With the troll defeated the heroes can slide down the collapsed floor and continue with part 2 of the quest in earnest. There is no time to bleed in this adventure, so their body points and abilities are restored. They may not visit the armory or alchemist shop on the way, and they most certainly cannot collect the promised reward—just yet.
Wandering Monster in this Quest: Priest and Devil Wolf
Hero Quest and the HeroQuest logo are trademarks of the Milton Bradley Corporation, a subsidiary of Hasbro, ©2008, in association with Games Workshop ©1988-1993. All rights reserved. Use of its theme and images in this post is not intended as a challenge or threat to their copyright. This quest is made available exclusively for private, in-home use and is not permitted to be altered or sold, in whole or part, for profit.

Leave a comment