Past the frozen caverns and bottomless chasms, and Torsten, you find yourself in a man-made chamber at the heart of the mountain. In some ways it reminds you of a temple, but to no god you recognize. The walls are covered in ancient script, the air is stale, and the only light is that of your torch. Not a temple, then. A tomb.
But tombs come with the promise of buried treasure, and no matter what the way back is shut. The way forward is a narrow tunnel into halls made for the dead—kept by the dead.
NOTES
This is a solo adventure meant to be played by a single hero (that played part 1 first). It is not a room-by-room type adventure, but a multi-phased affair, and one that will probably get frantic. Read through the quest at least once before attempting to run it. Or, you know, don’t.
The falling rock traps (and only the falling rock traps) are not active until the hero picks up the idol at I—meaning before this happens, the falling rocks can’t be triggered. Regardless, they cannot be detected or disarmed. Note that the giant falling boulder is not a falling rock (but described elsewhere). So, put your hard hat on and don’t die on the semantics hill.
Swinging axe traps are not triggered by monsters, but monsters may well end up decapitated. When a hero steps onto the square a huge axe falls from an alcove in the ceiling and swings at them. Roll 2 combat dice and lose 1 body point for each skull. In this quest, if a hero (or monster) has enough movement to clear the trap they only need to roll once (but woe to anyone who ends their turn in it). Swinging axe traps can be found and disarmed, even after they have been triggered.
A hero inside a pit trap may take actions as if they don’t see monsters, unless the monster stands adjacent to the pit. For the purpose of this quest, treat climbing down a pit trap the same as jumping it. If successful the hero does not suffer damage (and either way they end up at the bottom).
The giant rolling boulder trap is tied to the lever—pull the lever and down comes the boulder. It will tumble down the stairs, crash into the wall where it causes a cave-in that destroys the swinging axe trap, and blocks the corridor for good (fill 4 squares in a T-shape with rubble). Anything caught in its path rolls 5 combat dice and loses 1 body point for each skull. If something were to stand precisely in the square where the boulder ends its path, don’t bother with dice and simply remove it from the board. A hero that searches for traps will immediately realize the lever releases the boulder, and even a complete dimwit can see the giant hole in the ceiling (nope, still not a falling rock trap). The lever icon is only a map symbol and a hero can walk past the square with impunity (except maybe for an explicit urge to pull it…)
The four pit traps in the lower tombs (F and G) are open pits (place them on the board when the doors are opened). They are also connected and a hero that searches for secret doors while inside one of these pits will uncover a passage that links them (and no, searching the room above does not reveal this). It takes movement equal to squares on the board to pass between them. Take that all of you people who never search for secret doors inside pit traps.
The wandering monster trap is when this quest starts to go south. Enter stage right (at the XX mark): The Rustooze. This globule of gelatinous sludge has slimed its way around these tombs for generations. It doesn’t trigger traps (or levers) and moves unhindered by pits (it likes to sit in them, that’s why it’s a cube). If you want to add some pizzazz to the adventure, use a light up ice cube to represent it and queue the music. After all, the hero stuck with you this far—it’s probably ok to make it weird now.
| MOVE | ATTACK | DEFEND | BODY | MIND | |
|---|---|---|---|---|---|
| Rustooze | 1 die | 2 | 8 | 8 | 0 |
The Rustooze is immune to all magic that is resisted by Mind. It has access to the dread spell Rust, which it can cast an unlimited amount of times (but only on adjacent heroes).
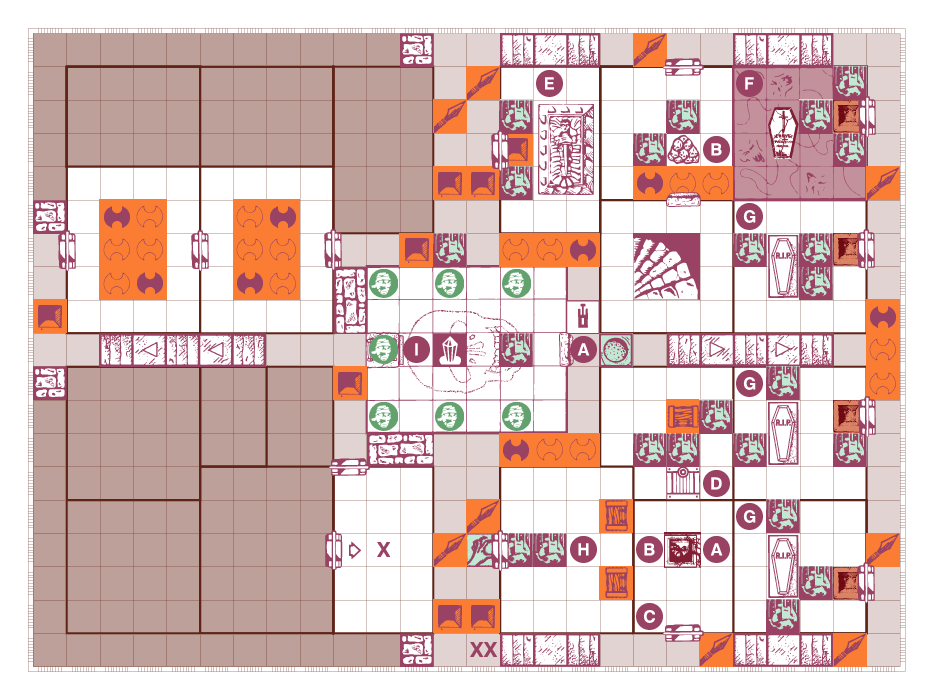
X. The hero starts here, in the same spot where part 1 concluded.
A. This is a sealed stone door that can’t be opened by normal means. An impulsive hero might pull the lever (on the opposite wall) without first investigating. The lever does not open the door, it releases the boulder. Later the hero can congratulate themselves on making the quest that much harder (and you can revel in their lamentation). The payoff is so much better when the trap isn’t even a trap.
B. The door to the stairs is a sealed stone slab. There is no discernible way to open it and right in front of it is a big pile of bones. But don’t worry, everything is not always a trap (ok, it’s a trap).
C. A solemn statue stands guard in this otherwise empty room. If a hero searches for secret doors they will discover scrape marks in the floor beneath the dust, and the statue can be moved sideways in either direction. If moved to position A, a distant rumble is heard and the door at A opens. If moved to position B, a distant, possibly different rumble is heard and the door at B opens. As soon as the statue is moved off either A or B, the corresponding door closes again—only one door can be open at a time. Beneath the statue’s original position is a hatch that leads to the room marked D. Choices, so many choices.
D. The chest in here is trapped with a poison needle that causes an unwary hero to lose 1 body and 1 mind point. It also contains gemstones worth 216 gold, so no need to be upset about it.
E. A grand sarcophagus stands on a raised dais in this room, but that’s it. Nothing but pomp in here, and traps that can’t be found until they spring. There is no treasure here at all and a hero may not even draw a card when searching. It’s like the most unfun room on the entire board.
F. This room contains a single tomb held in dusty stillness. Do not place the Living Fog tile (from the Frozen Horror expansion) when the door is first opened. If a hero searches for secret doors, reveal the tomb to be a false door (that is not trapped). When the crypt is opened (because let’s be real, it’ll be opened) a dense fog pours out and fills the room. Now place the tile, and as you do, two skeletons climb out from the crypt to take their turn. Inside the living fog nothing is what it seems and whenever a hero attacks a monster, first roll a combat die. If a skull or black shield is rolled, the hero is confused and hits nothing but fog (and the attack is wasted). If a white shield is rolled then continue the attack as normal. The undead are not affected by the fog.
G. This room also contains a tomb held in dusty stillness. But this is an actual grave where someone once important was laid to rest together with their favorite things—things they don’t need anymore. They moved on. They don’t even rise from the dead to defend it (totally lame). Anyway, a hero that searches for treasure may draw 3 cards from the pile and keep 1 (they can keep the lesson too).
H. The chests in this room contain 497 and 378 gold worth in jewels respectively, but a hero is unlikely to have enough time for a detailed appraisal on the spot. Both chests are also trapped with poison needles at 1 body and 1 mind point per pop. If curiosity killed the cat, greed straight up murdered the would-be hero, so don’t mess with karma in this room (especially not after grabbing the idol).
I. In this room seven mummies sit on thrones along the walls. They appear lifeless (well, duh) and do not move or react. At least not until the idol at the center of the room is disturbed, then all hell breaks loose (and the second phase of the quest begins in earnest). Best of all, nobody will see it coming.
The idol is a solid jade serpent, the largest gemstone the hero ever saw—it could probably buy all the equipment in the whole armory. The hero deserves to have it. That’s when Torsten shows back up (place him by the door after the hero has entered the room). He’s still alive. In fact, Torsten is so not dead he’s basically the hero’s sidekick at this point. Lured by the priceless idol, he’s willing to cut a deal with the hero. He proposes they work together to haul the treasure out, split it up, and then walk separate ways. It’s a win-win scenario (or at least a tenuous alliance that beats slugging it out again) and if the hero doesn’t want the idol, or play dice for it, Torsten is most certainly going to grab it.
| MOVE | ATTACK | DEFEND | BODY | MIND | |
|---|---|---|---|---|---|
| Torsten | 2 dice | 4 | 3 | 6 | 2 |
Once the idol is picked up (even if the hero goes full Indy), the whole place will begin to shake and the mummy guardians wake up. The shaking will continue for the rest of the quest and affect the whole board. All of it is about to collapse, and the time for leisurely exploring is over. The falling rock traps are now active and can be triggered. If the giant boulder has not yet been released, it shakes loose and crashes down the stairs before the hero can leave the room, and the hero is free to utilize the secret pit trap passage they for sure discovered earlier to avoid the mummies and make their escape. Only you will know what your hero did in earlier adventures to deserve this, but here we are. If the hero grabbed the idol by using Pass Through Rock, the ensuing earthquake cracks the door, lets out the mummies, and Torsten appears wherever the hero exits the room.
As if that was not all, one of the mummies is much larger than the others. It’s a badass mummy.
| MOVE | ATTACK | DEFEND | BODY | MIND | |
|---|---|---|---|---|---|
| Badass Mummy | 5 | 4 | 5 | 4 | 0 |
A badass mummy has access to the dread spells Fear and Summon Undead.
If the hero makes it to the stair, they can leave and the quest ends. Note that this could happen at any point, idol or no idol. When it does, paraphrase from below as you see fit (due to crunch there was only time to write one ending).
You stumble out into cold snow, followed by the large mummy and a cloud of dust. The passage behind you collapses inward and the stark sunlight turns the mummy to ash before your eyes. Once again, there is no sign of Torsten and in your hands you clasp a sack that holds rubies, emeralds, sapphires… and one large jade serpent. Today was a good day.
Wandering monster in this quest: 2 Skeletons
Hero Quest and the HeroQuest logo are trademarks of the Milton Bradley Corporation, a subsidiary of Hasbro, ©2008, in association with Games Workshop ©1988-1993. All rights reserved. Use of its theme and images in this post is not intended as a challenge or threat to their copyright. This quest is made available exclusively for private, in-home use and is not permitted to be altered or sold, in whole or part, for profit.

Leave a comment