You cut Nergal Kahn deeply, but much like his horde this relentless orc refuses to die. In rage he slams his clawed scepter into the ground. It rumbles, shakes, and a freezing chill fills the air. The earth beneath your feet moves, then implodes, and a bottomless chasm opens up. It swallows a few orcs and some furniture, but you manage to pull yourselves up on one side.
You see Kahn on the other. He escapes through a door, right before the roof collapses to block any pursuit. Before you can contemplate this godly intervention further, and with a high pitched screech, winged demons pour out from the abyss. Kahn will have to wait—you need to get out of here.
NOTES
The gargoyles will only attack the hero who carries the amber gem if there are no other heroes to attack (even if that means they have to move away from, or around, this hero). Don’t tell your players this.
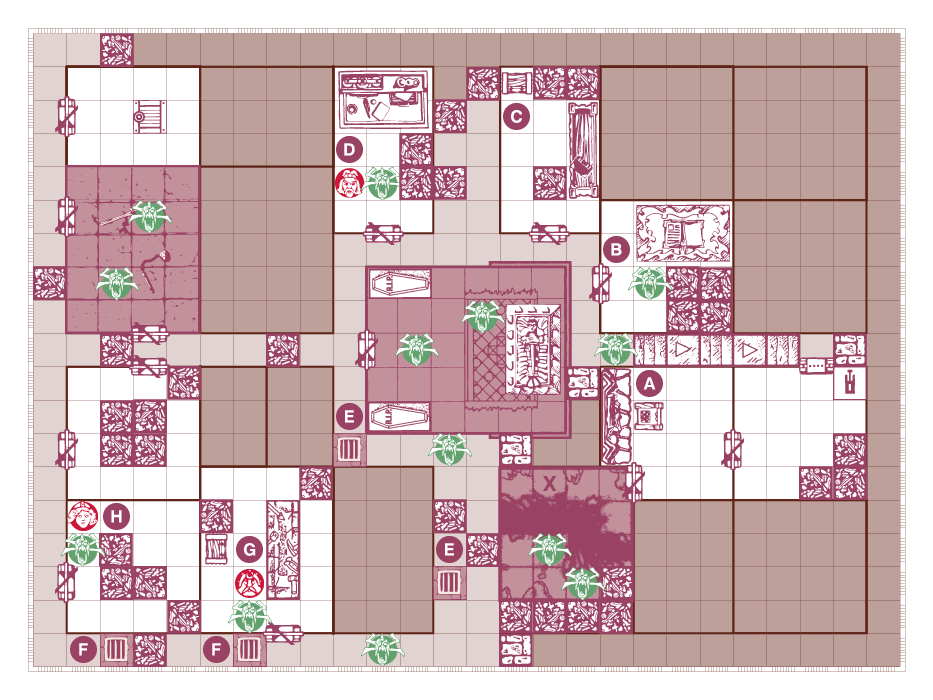
X. Heroes start where part 1 left off. Place the bottomless chasm room tile (from the Frozen Horror) in the room, and fill the bottom part with rubble. Also place rubble to block off the door to the room with the stairs. Remove Nergal Kahn from the board and move all heroes to the ledge on the top side of the room (marked with the X). Note that the gargoyles fly,and can move over the chasm unhindered (even “stand” on the black to attack the heroes should they need to).
A. Go ahead, topple the chair. There was an earthquake in the adjoining room for gods sake.
B. If the heroes did not search this room for treasure previously, a Spell Ring can still be found in the rubble.
C. The chest contains no gold. We all know who took it. And now the spell scrolls are gone too.
D. If the friendly warrior survived part 1, he is still there. The gargoyle is there regardless. If the heroes help the alchemist survive the gargoyle, he has no potions left to give, but offers to turn any equipment they carry into gold. Any equipment card can be exchanged for 100 gold a pop (but not the amber gem). If he dies, the heroes can search the rubble for treasure and find a Potion of Healing (which, once again, he didn’t have time to consume).
E. Another trek through the sewers will be necessary, and 7 movement is still required to do so. But hey, bonus, it’s beneath the gargoyles to follow.
F. At least this sewer is shorter, and can be cleared with only 4 movement.
G. If the forge master survived part 1, he is still there. And if he survived, the chest still contains 167 gold coins and a Battle Axe—which he will still stubbornly defend with his last breath. But he did finish the Plate Mail (if the heroes paid him to repair it in part 1). If he didn’t survive, the chest is empty, and he never had time to fix the armor. The gargoyle is there regardless.
H. If the friendly warrior survived part 1, she is still there and whooping some gargoyle ass. The gargoyle is there regardless (of being whooped or not).
There are two possible endings to this quest. If the heroes make it all the way back to the tunnels below the merchants quarters, first congratulate them on their epic achievement, then read the following:
The winged demons still circle the sky when you slip down the hatch and into the tunnels below the merchant quarter. Timurkand is burning above you, but for the moment it appears you have escaped the destruction. Hours later you emerge to the dark of night and relative safety. Exhaustion sets in and as you sit down to rest, you fall asleep.
If the heroes are all killed, when the hero with the amber gem finally falls, read the following:
Surrounded by the bodies of your friends, beset on all sides by demons, you prepare to meet your maker. In that moment a reassuring warmth emanates from the pouch with the gem. You grasp the amber stone and pull it out. The warm glow turns into an explosion of searing light, one that tears the winged beasts apart. Exhaustion overcomes you and light turns to darkness. You fall unconscious to the ground.
Regardless of how it ends, continue to part 3. This time body points, abilities and spells are regained, but the heroes still can’t visit the armory or alchemist shop.
Wandering Monster in this Quest: Gargoyle
Hero Quest and the HeroQuest logo are trademarks of the Milton Bradley Corporation, a subsidiary of Hasbro, ©2008, in association with Games Workshop ©1988-1993. All rights reserved. Use of its theme and images in this post is not intended as a challenge or threat to their copyright. This quest is made available exclusively for private, in-home use and is not permitted to be altered or sold, in whole or part, for profit.

Leave a comment